Selasa, 20 Mei 2008

Mikrotik

Membuat Hostpot Dengan Mikrotik


Begitu mudahnya untuk menggunakan mikrotik. Konsep networking yang sudah anda pahami akan sangat mudah di implementasikan di operating sistem router yang berbasis kepada linux kernel ini. Kali ini kita akan praktekan sebuah judul yang banyak di nanti orang banyak. Judul yang di ambil adalah, membuat hotspot dan user manager dengan router yang sama.

Langkah pertama adalah sbb :

1. Buat sebuah server Radius
/ radius add service=hotspot address=127.0.0.1 secret=123456

2. Buat profile dan set profile tersebut untuk menggunakan Radius Server
/ ip hotspot profile set hsprof1 use-radius=yes

3. Membuat scriber
/ tool user-manager customer add login="MikroTik" password="qwerty" permissions=owner

4. Tambahkan Router kita dalam hal ini localhost.
/ tool user-manager router add subscriber=MikroTik ip-address=127.0.0.1 shared-secret=123456

5. Lalu silahkan browser ke http://routeranda/userman

Mikrotik

Cara Membuat PC Router Dengan Mikrotik


Dikirim Mikrotik dengan pengait kata (tags) pada Mei 17, 2008 oleh asep02

Untuk membuat PC Router kita membutuhkan satu paket PC yang memiliki dua ethernet card, 1 ethernet digunakan untuk koneksi ke internet dan yang satunya lagi untuk koneksi LAN yang akan anda buat.

1. Install Os Mikrotik pada PC yang telah anda sediakan

Berikut adalah langka-langkah untuk membuat PC Router :

# Langkah pertama, pastikan ethernet telah terdeteksi oleh PC anda dengan mengetikan perintah berikut :

[admin@Mikrotik] > interface print
Flags: X - disabled, D - dynamic, R - running
# NAME TYPE RX-RATE TX-RATE MTU
0 R ether1 ether 0 0 1500
1 R ether2 ether 0 0 1500

kalau sudah muncul seperti tampilan di atas, berarti PC anda telah memiliki dua ethernet card

# Langkah Kedua, berikan ip address pada kedua ethernet yang ada pada PC anda dengan mengetikan perintah di bawah ini :

[admin@mikrotik] > ip address add address=192.168.100.1 netmask=255.255.255.0 interface=ether1
IP address di ether1 adalah IP yang di berikan oleh ISP yang langsung connect ke internet, sedangkan IP address ether2 adalah IP untuk koneksi LAN yang akan kita buat. Kemudian ketkan perintah Berikut :

[admin@mikrotik] > ip address add address=192.168.0.1 netmask=255.255.255.0 interface=ether2
Untuk melihat IP address yang telah kita buat ketikan perintah di bawah ini :

[admin@mikrotik] >ip address print
Flags: X - disabled, I - invalid, D - dynamic
# ADDRESS NETWORK BROADCAST INTERFACE
0 192.168.100.1/24 192.168.100.0 192.168.100.255 ether1
1 192.168.0.1/24 192.168.0.0 192.168.0.255 ether2
[admin@mikrotik] >

# Langkah ketiga, berikan DNS Server dan Gateway yang telah diberikan dari ISP , dengan mengetikan perintah berikut :

Untuk memberikan Gateway ketkan perintah di bawah ini,

[admin@mikrotik] > /ip route add gateway=192.168.88.1
Untuk melihat Gateway yang telah kita buat ketikan perintah ,

admin@mikrotik] > ip route print

Flags: X - disabled, A - active, D - dynamic,
C - connect, S - static, r - rip, b - bgp, o - ospf
# DST-ADDRESS PREFSRC G GATEWAY DISTANCE INTERFACE
0 ADC 192.168.0.0/24 192.168.0.1 ether2
1 ADC 192.168.100.0/24 192.168.100.1 ether1
2 A S 0.0.0.0/0 r 192.168.100.100 ether1
[admin@mikrotik] >

Kemidian untuk setup DNS ketkan perintah di bawah ini :

[admin@mikrotik] > ip dns set primary-dns=124.81.87.5 secondary-dns=124.81.87.6

Untuk melihat DNS server yang telah kita kofigurasi ketikan perintah di bawah ini,

[admin@mikrotik] > ip dns print
primary-dns: 124.81.87.5

secondary-dns: 124.81.87.6

allow-remote-requests: no
cache-size: 2048KiB
cache-max-ttl: 1w
cache-used: 16KiB

[admin@mikrotik] >

# Langkah ke empat, adalah setup Network Address Tranlation ( NAT ), disinilah hal yang paling penting. Apabila NAT tidak dijalankan maka Local Area Anda tidak akan terkoneksi ke internet.

Untuk mensetup NAT ketikan perintah di bawah ini :

[admin@mikrotik] > ip firewall nat add chain=srcnat action=masquered out-interface ether1

Keterangan : ” Interface yang di NAT adalah ethernet yang terkoneksi ke internet “

Untuk melihat Setup NAT yang telah Anda buat ketikan perintah di bawah ini :

[admin@mikrotik] ip firewall nat print
Flags: X - disabled, I - invalid, D - dynamic
0 chain=srcnat out-interface=ether1 action=masquerade

[admin@mikrotik]

Selesai, tinggal Anda tes koneksi dari komputer yang di LAN Anda, dengan cara melakukan browsing atau ketikan perintah Ping ke nama domain seprti yahoo, google , dll. atau test ping gateway anda.

bila sudah muncul tampilan seperti di bawah ini :
C:\>ping yahoo.com -t

Pinging yahoo.com [66.94.234.13] with 32 bytes of data:

Reply from 66.94.234.13: bytes=32 time=368ms TTL=49
Reply from 66.94.234.13: bytes=32 time=339ms TTL=48
Reply from 66.94.234.13: bytes=32 time=543ms TTL=48
Reply from 66.94.234.13: bytes=32 time=363ms TTL=49
Reply from 66.94.234.13: bytes=32 time=329ms TTL=48
Reply from 66.94.234.13: bytes=32 time=377ms TTL=49

Ping statistics for 66.94.234.13:
Packets: Sent = 8, Received = 6, Lost = 2 (25% loss),
Approximate round trip times in milli-seconds:
Minimum = 329ms, Maximum = 543ms, Average = 386ms

C:\>

Berarti anda sudah berhasih membuat pc Router dengan Mikrotik.

Selamat mencoba !

GOOD LUCK

Wireless links

Mei 19, 2008

Wireless links

Point to Point

50 km link, as low as $598!

Multipoint

Connect Up to 100 clients!

Backbone + AP

High speeds at distant sites!

Nstreme

DOUBLE the Speed!

WDS

Roaming!

High-speed wireless systems are used to provide internet access to end-users using point-to-point or point-to-multipoint architecture. Wireless data links take place where there is no infrastructure for internet access or in places where bandwidth offered by current channels is too low. With our wireless equipment you can get high bandwidth on a very long distances at very reasonable price. Our equipment provides various features including firewall, NAT, VPN, Bandwidth Management, QoS and many more.

Why choose Mikrotik?

  • Cost effective solution
  • High-speed wireless data links (Up to 108Mbps)
  • Connection distance up to 70 km without repeater sites.
  • IP - NAT, Routing, DHCP
  • Security - Firewall, Secure Tunnels
  • Control - Queues, Proxy, Accounting, HotSpot
  • Fast and simple installation for base station and clients
  • Reliable and instant 24 hour internet access

Basic requirements to create a wireless links are:

  • Direct Line of sight between both points of presence
  • Distance between points of presence is:
    • up to 25 km for point-to-multipoint links
    • up to 70 km for point-to-point links
  • Use of 2.4 or 5.2-5.8 GHz solutions according to the local regulations. In some countries obtaining a special license might be required.

Our wireless systems come with Mikrotik RouterOS software preinstalled. RouterOS will enable you to use many features such as: firewall, NAT, bandwidth management, different kinds of tunnels, HotSpot and others.


Point to Point link

Point-to-point links

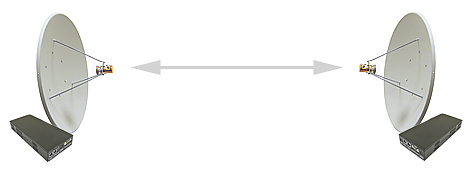
PtP links are an excellent way how to make connections between two sites and achieve high data transfer speeds. This is an ideal way how to connect two offices. Also these type of wireless links are very useful if you need to create backbone link from some distant radio access point to your main Internet source. For creating such connections we recommend to use our 5 GHz and 2.4 GHz wireless client kits.

A customer from Bulgaria reports:

“This 35Mbit at 57km is with non-turbo mode, unidirectional, with random-data=no. Machines on both ends are 700MHz C3. During the test, both routers (that have few more Atheros interfaces each), were not transporting traffic.”

To make this setup, you can use:

Click here for setup instructions


Point to Multipoint link

Point-to-multipoint setup

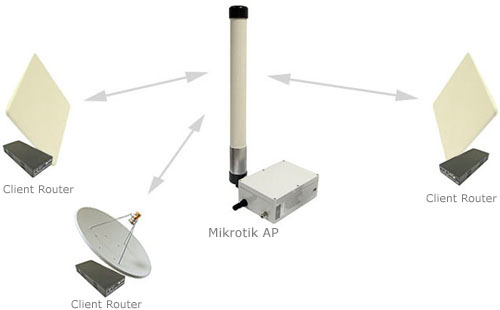
PtM connections are the most usual way how wireless ISPs connect their customers. They put access point somewhere high in the tower above the city or on some high building and then point their client antennas to this access point.

To make this setup, you can use:

Click here for setup instructions


Backbone link + AP

Backbone link + AP

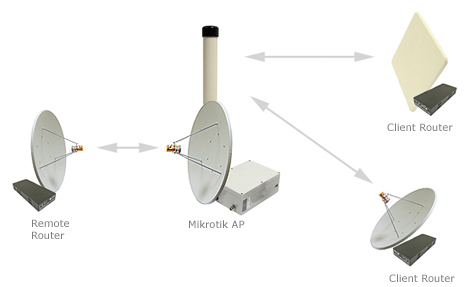
This is a point to multi-point link with additional wireless cards and antenna for a backbone connection. Such links are useful when creating a WISP infrastructure, for example you have main Internet source with 5 GHz base station and lots of 2.4 GHz clients in various sides of the city. Such kits can be but in localized parts of the city and contain 2.4 GHz omnidirectional antenna and 5 GHz directional antenna to main base station.

To make this setup, you can use:

Click here for setup instructions


Nstreme2 link

Nstreme and Nstreme2

These are MikroTik proprietary wireless protocols to achieve outstanding performance on a very long range links. Regular wireless links will have large time delays for data traveling on a long distances, with nstreme you do not have to worry about this anymore.

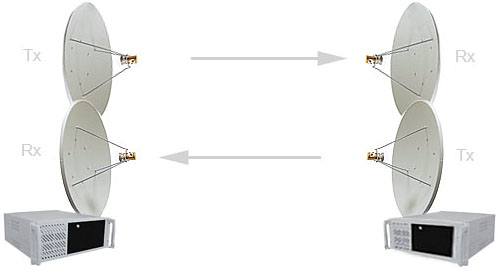
Nstreme 2 goes even further by using two wireless cards in each end - one for transmit and one for receive.

Our customers have links of 60 km and speed of 35 Mbps without turbo mode.

A customer from Bulgaria reports:

“65 km, AR5213, 37 Mbit with n-streme (TCP test), We’re using 2.4 GHz proccesors or better, 5GHz-turbo mode”

To make this setup, you can use:

  • Two PCs with Celeron 700 or higher
  • Four Atheros PCI wireless cards with pigtails
  • Four antennas
  • Two IDE flash disks with latest version of RouterOS software.

Click here for setup instructions


WDS link

WDS

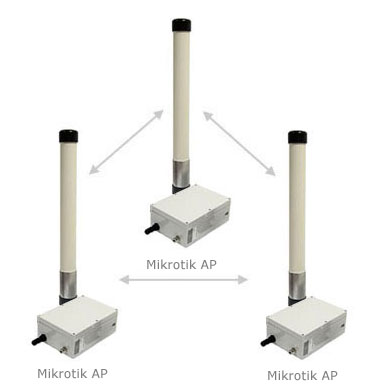
WDS (Wireless Distribution System) is the best way how to interconnect many access points and allow users to move around without getting disconnected from network. Using this system you can cover large areas and allow users to move for large distances while still being on-line. This system allows packets to pass from one wireless AP (Access Point) to another, just as if the APs were ports on a wired Ethernet switch. APs must use the same standard (802.11a, 802.11b or 802.11g) and work on the same frequencies in order to connect to each other.